|
|
||||||||||||
 |
On this page you can follow a step by step description on how to build a hoophouse. I've started with an article published by Mother Earth News [Oct-Nov 2011], and made changes during construction. Perhaps you will be able to improve my plans. Please post your comments on our Facebook page for others to share. | |||||||||||
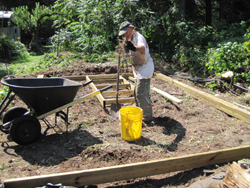
| Find a piece of land which is already fairly graded, and build a strong frame. | ||||||||||||
 |
||||||||||||
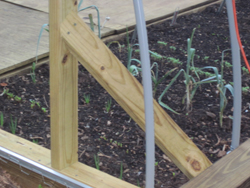
| Build a frame with outdoor treated lumber. I decided on a 16 ft long by 10 ft wide inside measurements.
For the long side I purchased four 6x6 in 8 ft lengths. Probably over-spec but I wanted a strong and heavy frame. The short sides are framed with two 2x6 of 12 ft length cut to 11 ft to match with the 10 ft inside measurement. |
||||||||||||
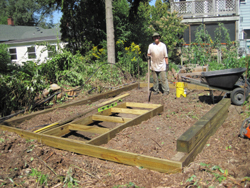
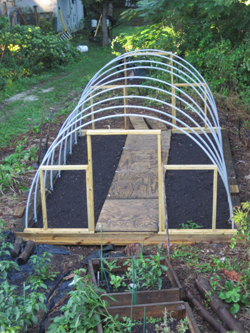
| In the picture above I'm digging a trench in the middle to accomodate the frame of my vermiculture bins, which are under the center walkway.
The idea is to have a plywood pathway to stand on for winter gardening, with worms underneath to process kitchen scraps. The two raised beds will measure 16 ft length and 3.5 ft width, while the pathway bins are 3 ft wide. |
||||||||||||
 |
||||||||||||
| The vermiculture frame is built with four 2x6 lumber in 8 ft length, with 2x4 lumber cut to match the 3 ft width.
This is a change of plans. Initially I though to devide my 10 ft width in two 3 ft beds with a 4 ft pathway. But I then recognized that the 4 ft wide panels of the vermiculture bins would be too heavy, so I changed to two 3.5 ft beds with a 3 ft pathway. |
||||||||||||
| In this picture you see the vermiculture frame anchored to the outside frame. Note the pathway is built in two parts and is inserted into the large frame. | ||||||||||||
 |
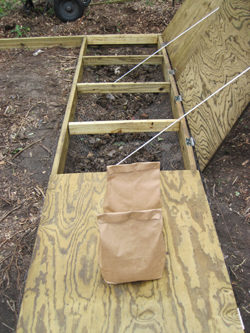
Once the frame is square, the patchway is covered with the plywood panels. I purchased the lumber at Lowe's where the panels were cut to size: 4x3 ft.
8 hinges allow for the vermiculture bins to open. |
|||||||||||
| A detail that you cannot see! Before the vermiculture frame was anchored to the frame, I've laid a 4 ft wide chicken wire which is attached to the frame sides.
The idea is to prevent vermin to move in in the winter. |
||||||||||||
 |
I'm building the frame in early September, I want the worms to start working and lay eggs before it gets too cold.
I purchased 5 pounds of Red Wigglers. I'm told that Red Wigglers do better in cold weather than Night Crawlers. I'm a beginner in vermiculture and I'm experimenting. More details will follow on a different web page. I'm now experimenting on how fast 2.5 pounds of Red Wigglers go through the kitchen scraps. |
|||||||||||
| I'm planning to have the worms migrate from the completely filled South bin toward the North bins which are now empty. | ||||||||||||
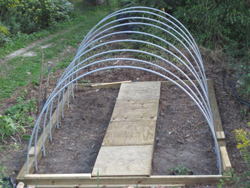
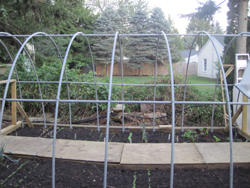
| The hoops are anchored to the frame. | ||||||||||||
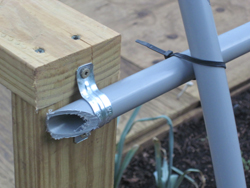
| For the hoops I've purchase 3/4" electrical conduit. Two 10 ft conduits are glued to make a 20 ft arch.
Notice that each arch is inserted in a 1 1/4" piece of conduit that is pounded 18" into the ground and anchored to the frame. It turned out that the 20 ft hoops span over the 10 ft width to make a 5' 6" tall arch, perfect for me to stand on the pathway. |
||||||||||||
 |
||||||||||||
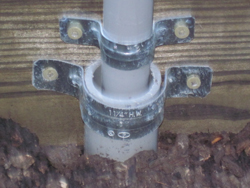 |
A detail picture of how the 1 1/4" conduit is pound 18" deep in the ground, about 2" below the top of the outside frame.
Once all hoops are installed and the furloughs are even, the 3/4" arches are anchored to the trame. I guess the 3/4" hoop is at least 1 ft on each side into the 1 1/4" ground conduit. It should be possible to adjust the arch height to 6 ft. |
|||||||||||
 |
||||||||||||
| The furloughs are the horizontal conduit poles, made of 3/4" conduit. I've glued two 10ft conduits and cut them approximately to measure the 16" length.
You will see the detail of the final conduit cut on the picture that shows the anchor to the door frames. |
||||||||||||
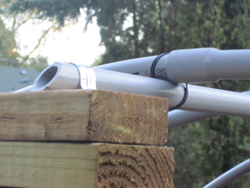 |
In this picture you see the furlough anchored to the door frame.
Notice how the conduit is cut on an angle to avoid friction against the tarp. But I'm getting ahead of myself! Before you can install the furloughs and tighten all hoops, the door frames must be built and inserted on the frame. |
|||||||||||
| Build the door frames and insert them onto the base frame. | ||||||||||||
 |
||||||||||||
| I decided to build a door on both sides of the hoophouse to have more access flexibility.
But the two doors will also allow greater ventilation in the spring. The door frames are built with 2x4 lumber and anchored to the base frame. The door frame measurements are taken to ensure the corners roughly match with the hoops to anchor the side furloughs. Pieces of lumber are anchored over the door frame to reach the desidered heigth of the arch. |
||||||||||||
 |
The door frame is anchored to the base frame and supports the ridge and sides furloughs.
A piece of 2x4 is anchored on the 4 corners to give stronger stability to the structure. |
|||||||||||
 |
An other detail picture of how the side furlough is anchored to the door frame.
Notice how the hoops and furloughs connect with lace ties. I decided against connecting the conduits with bolts [Mother Earth News article shows bolts securing the hoops to the furloughs]. Drilling holes through the conduits would make them structurally weaker. |
|||||||||||
| Page updated: September, 2012
Wanted: Hoophouse Gardeners If you'd like to participate with the Kenosha Hoophouse Exchange - here are your options:
Please join us on Facebook - Click here
|
||||||||||||
|
|
||||||||||||